How to Connect with Qi Coils™Updated 3 months ago
PART I: REQUIRED ITEMS
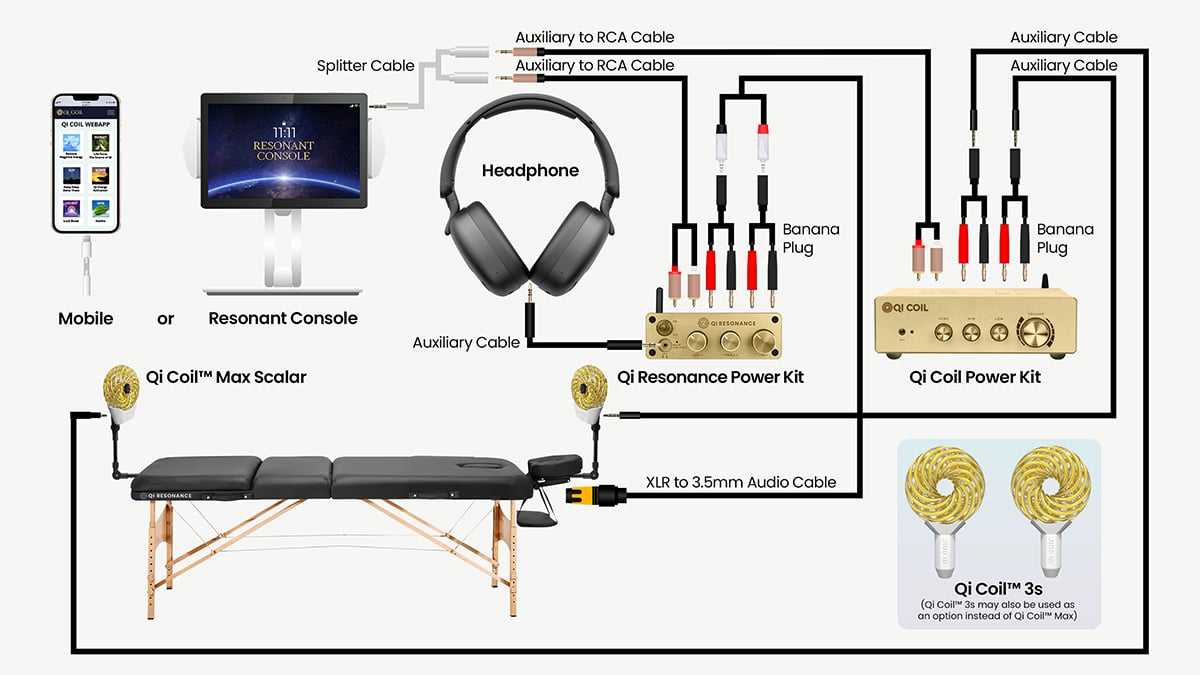
- Qi Resonance Bed
- Resonant Console
- Qi Resonance Power Kit
- Aux to RCA Cable
- 5-pin XLR Connector to RCA Cable
- 2 x Banana Plugs
OPTIONAL ITEMS/UPGRADES
- Qi Coil Max/3s Yin and Yang
- Qi Coil Power Kit
- 2 x Qi Coil Mounting Arm Brackets
- Audio Splitter Cable
- Aux to RCA Cable
- 2 x 20ft. Auxillary Cables
- 2 x Banana Plugs
- Magnet Testers
PART II: SETUP INSTRUCTIONS (WIRED)
- Connecting the Resonant Console to the Qi Resonance Power Kit and Resonant Power Kit.
- Open the Resonant Console App on your Console.
- Select the Luck Boost album and press Play.
- Turn the Console’s Volume to Maximum, you should be able to hear its sounds.
- Connect the Audio Splitter cable to the console’s headphone port.
- Connect one end of the Audio Splitter Cable to the Audio to RCA cable to the Input Channel at the back of the Qi Resonance Power Kit.
- Connect the other end of the Audio Splitter Cable to the Audio to RCA cable to the Input Channel at the back of the Qi Coil Power Kit.
- Plug the power cable into the Qi Resonance Power Kit and turn it on.
- Set the volume of the treble and bass knobs to “0” or far left
- Set the main volume of the Qi Resonance Power Kit to 40%.
- Plug the power cable into the Qi Coil Power Kit and turn it on.
- Set the volume of the Qi Coil Power Kit to 75%.
2. Switching to Auxiliary Mode
A: Check the power light indicator on the power kit:
- If the light is blue and blinking, it is in Bluetooth mode and is not connected to a device.
B: Short press the Volume Button to switch to Auxiliary mode.
The light indicator should turn green when successfully switched.
3. Connecting the Qi Resonance Bed to the Qi Resonance Power Kit
A. Connect the 5-pin XLR Connector to the mount located at the head of the bed.
B. Connect the RCA end to the banana plugs:
- Plug the RED audio jack’s banana plug into the Sub Binding Post.
- Plug the BLACK audio jack’s banana plug into the Main Output Binding Post next to the sub.
4. Testing the Qi Resonance Bed
- Play the Luck Boost frequency – Your bed will play the sound and will occasionally vibrate.
- Alternatively, you can play the Magnet Testing frequency – Your bed will vibrate.
If the bed plays the sound and vibrates, your Qi Resonance Bed is working properly.
5. Attach the Qi Coils to the Qi Resonance Bed.
A. Assemble the Qi Coil Mounting Arm so all parts are attached together.
- Make sure to loosen the clamp knot a bit so the bracket will be attached in an upright position.
- Make sure the ball head is rotated at a 90-degree angle.
- Attach the clamp at the end of the bed and tighten the grip.
- Attach the Qi Coil to the Ball head adapter with the disc attachment.
- Do the same steps to the other Qi Coil.
6. Connect the Qi Coils to the Qi Coil Power kit.
- Connect Qi Coil to Qi Coil Power Kit with an auxiliary cable.
- Connect the other end of the cable to the Banana Plugs
- Plug the Red Audio Jack to the red post and the black Audio jack to the black post.
- Do the same steps to the other Qi Coil.
7. Testing the Qi Coils
- Play the Magnet testing frequency
- Hold the gold magnet and get it close to the Qi Coil to test for vibrations.
- Alternatively. Hold the small magnet in the plastic jar close to the Qi Coil to test for magnet movement.
If the magnet vibrates, then your Qi Coil is working properly. Do the testing to the other Qi Coil too.
Important Notes:
- ⚠️ Treble/Bass
Max Volume: 50%
- For normal operation, do not turn the Resonant Power Kit’s volume knob past the 3 o’clock position (75%) to prevent overheating.
- Lower frequencies will create stronger vibrations than higher frequencies.
- The vibration on magnet testing for the Qi Coils is primarily for testing purposes only.
Troubleshooting: Still Not Working?
- Make sure that the Console/Mobile Device is turned on and connected to the power kit via Bluetooth or RCA cable.
- Make sure the volume is turned up on the power kit and console.
- Make sure all cables are securely connected
- Ensure that test frequency is playing
- Repeat Setup steps
If issues persist, contact our support team at [email protected]